Deploying Your Site to Neocities
May 15, 2024
So, Neocities…isn’t exactly equipped for heavy editing. The code editor is limited in its functionality and the file upload process is so simple that it actually becomes cumbersome. Its simplicity is one of its selling points, but trying to update your site can get very tedious, very fast, especially the more it grows.
After a failed attempt at wrangling the native Neocities GUI and messing up my file structure, I decided I wanted to simply abstract it away. I found two primary ways to do so, but neither had a ton of documentation, and as someone who was still just getting started with web development, it took a bit of extra care to get everything working. I’ll just be reiterating the instructions for both deployment methods with a little extra context and guidance for anyone who needs it.
I’m using a static site generator (Hugo), but the methods outlined here will work even if you aren’t.
OPTION 1: Neocities CLI
Neocities has an official, supported command line interface tool to upload your website. This is a good option if you want to decouple your site from GitHub, and/or if you are comfortable with the command line. Even if neither of these apply, this tool is still functional and straightforward. It’s what I used initially, but it’s been a year since then, so if any of this information is out-of-date, please do correct me. If you’d like to get started, you must:
- Install Ruby. Your install method will depend on your OS.
- On Linux, you could run
sudo apt-get install ruby-full - On Windows, you’d use Ruby Installer.
- On Linux, you could run
- Open your command prompt and install the Neocities CLI with
gem install neocities - Type
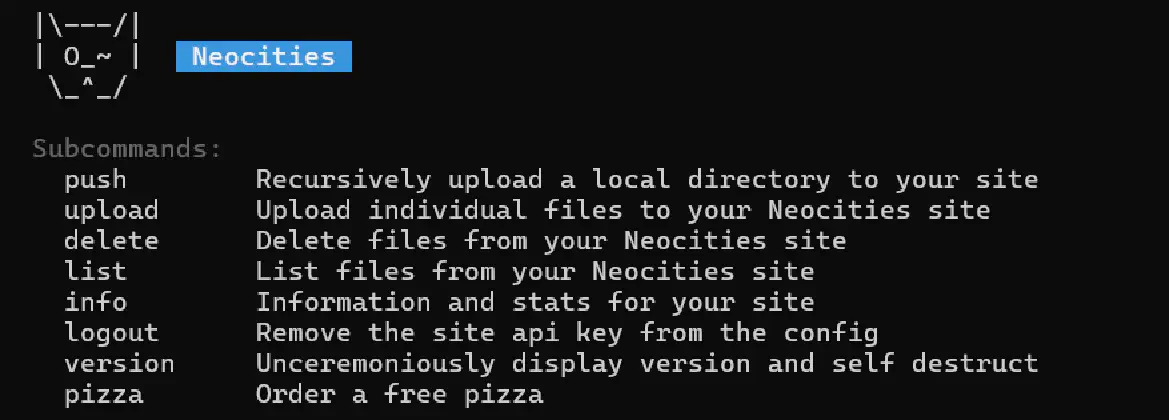
neocitiesto pull up a list of subcommands. It should look like this:
- To push your site, copy the URL of your public directory (very important for SSGs) and then use the command
neocities pushto publish it via the command line.- In my case, whenever I wanted to push updates, the full command was
neocities push /home/jay/Documents/Code/nenrikido/public
- In my case, whenever I wanted to push updates, the full command was
Notes
- When you first attempt to utilize any of the subcommands, it will prompt you to input your site name and password, then locally store your API key for future use.
- File uploads can feel pretty slow. The tool checks every single file in your folders to see if they’re already uploaded on Neocities, and if you have hundreds of files (like if you have, say, a gallery), it can get tedious to watch. This is especially true if you only want to upload one or two files. I haven’t quantified the time difference between uploading changes with the CLI vs. the GitHub Action, but the latter definitely seems faster.
- If you locally delete a file in your public directory, it won’t automatically delete it from Neocities. This is presumably to make sure you don’t accidentally lose data, but it can cause unexpected consequences. If you want to delete a file or folder, make sure you manually delete it locally and also on Neocities.
- If your site is on GitHub and you’d like to use this tool, you can use a Git hook to deploy to Neocities whenever you push changes to GitHub. However, for this usecase, I think it’d likely be simpler to just use the next method.
OPTION 2: Deply to Neocities (GitHub Action)
Once I put my site on GitHub, it seemed natural to switch over to the popular Github Action that publishes your site updates on Neocities whenever you push updates to your Github repository. Convenient! I think this is the obvious choice if your site is on GitHub, which is something I would generally recommend.
These steps assume that you’ve already 1. pushed your site to GitHub and 2. have no workflows yet. To get it up and running:
- Create a folder called
.githubin your root directory. - Within this folder, create another folder called
workflows - Create a file called
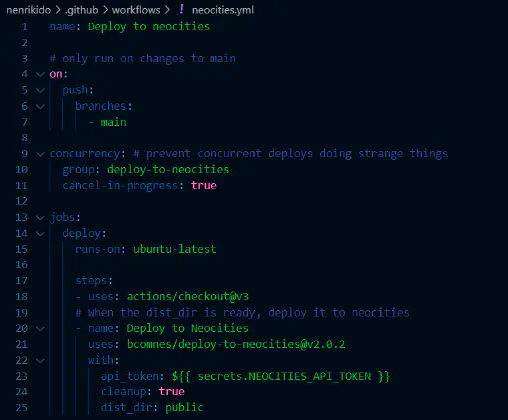
neocities.yml - Using this basic template, fill out your workflow.
- Your usecase will likely vary from what is outlined here. For example, if you’re not using node, you obviously won’t need to involve those steps.
- You can see my very basic implementation here.

- You can also look through all the sites that are dependent on it to see how they set up their configuration if you need examples.
- Fetch your API token from https://neocities.org/settings/{{your-sitename}}#api_key
- Set your API token as a GitHub secret (for security reasons) and name it NEOCITIES_API_TOKEN
- Make sure your dist_dir is set to whatever directory you want published on Neocities and have at it!
Notes
- This will work on a private repository.
- The
cleanupfield can be set to true or false. Your choice determies whether you want to delete files on Neocities that aren’t in your Github directory. It is set to false on default, but I set it to true because I have a tendency to change up my file structures, which leaves orphaned files on Neocities.- Coincidentally, this is a feature that Hugo has no intention of implementing, much to my chagrin.
- I believe this method, similarly to the Neocities CLI, goes through your folders and files alphabetically. This has rather annoying consequences for the automatic (and entirely unconfigurable) profile activity updates. It used to be that the last page you edited was the one that showed up as a primary thumbnail, but now it seems to be the first. This change is fairly recent.
- You can try to do tricksy things like changing Hugo front matter from
draft: falsetodraft: trueand vice versa while generating your public directory to achieve more granular control of the order your updates show up, but it sort of defeats the purpose of a one-click solution to just update your site.
- You can try to do tricksy things like changing Hugo front matter from
- Updates are not instant, but my (very unscientific) measurement says that your site will reflect updates within a minute or less. It feels very efficient. I’m sure someone more knowledgable will know why, but alas, that is not me.
Hopefully, this was at least somewhat helpful. I’m hardly an expert on GitHub, CLIs, or SSGs, so getting everything to work the way I wanted it to was (and still is!) often intimidating and unapproachable. I am the sort of person who needs lots of examples and hand-holding to feel confident in implementing something new (or, more typically, to mess it up over and over until I figure things out), so I thought it would make sense to write up the sort of guide I would have liked back then. Maybe then I wouldn’t have tried to upload my entire root directory to Neocities with the CLI…
Well, anyways. Apologies for the trickle of site updates. I am actually moving yet again, and there’s so much to be done on this site that I often feel dizzy just thinking about it. Still, I plan to see it through to the very end. Hope you are all doing well.
UPDATE (08/20/24): Something I’ve noticed about these tools and figure should be documented is that the CLI is much better at explaining the cause of errors. The GitHub Action just returns an error with fetching the API, but the CLI is very specific about why your site update failed. It’s how I discovered the (now fixed) filename character bug, in fact! So, I’d argue the CLI feels more reliable, if clunkier and less convenient.